Sunday, 29 December 2013

How to quickly create a project with all objects of a specific layer

How to quickly create a project with all objects of a specific layer

Challenges:

  • When investigating code in Ax, it may be useful to get a quick overview of all the code in a specific layer.

  • When you intend to move code from one layer to another, you may need a list of objects in a specific layer.
Follow these steps in order to get a solution for both challenges with ease:

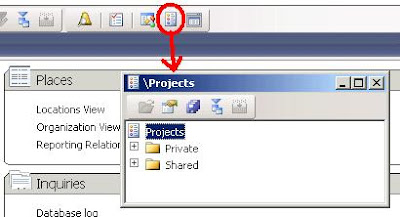
Step 1: Create a new project.


You can rename your project as desired, we'll call it Project_USR_Layer for now. Then open the newly created project.


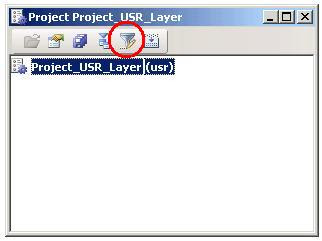
Step 2: Choose Advanced Filter/Sort from the toolbar.


If you are into keyboard short-cuts, you can use Ctrl-F3 for this as well.
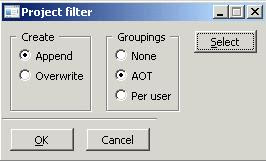
A new dialog pops up.


I like my objects grouped in the project as they are grouped in the AOT, so I've chosenGroupings - AOT.


Step 3: Select the required objects.
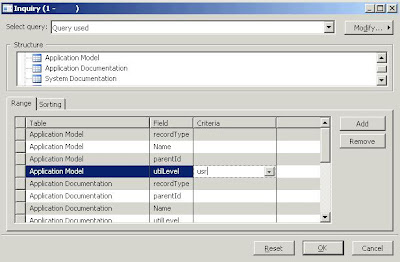
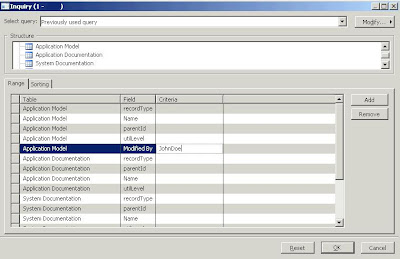
Use the Select button on the dialog to select the objects you require for your project.
We wanna select all AOT objects from a specific layer, so we'll use the UtilLevel field in the selection criteria.


From the screenshot you can see that all objects from the USR layer are selected. If desired, you can limit the type of AOT objects for your project as well, by using the recordTypefield.

Confirm twice and the objects are added to your project. This may take some time, so be patient :-)

Similar challenge:

You can use the same method for selecting AOT objects modified/created by a specific programmer. Just set different selecting criteria in your query.


Move all object of a layer into the project in ax 2009

Move all object of a layer into the project in ax 2009

30Dec
There are many ways to take backup of our all development work like in AX 2009 we can copy usr layer and in AX 2012 we can export model we are working.
We can also export all the objects of layer and take backup. but for doing this we need to move all the objects from a layer into the project. Below I am defining how can we do it.
Step 1: Create a new project.
Then open the newly created project.
Step 2: Choose Advanced Filter/Sort from the toolbar.
A new dialog pops up.

project filter in dynamic ax
You can choose grouping of the objects as in the AOT or by user.
Step 3: Select the required objects.
Use the Select button on the dialog to select the objects you require for your project.
We wanna select all AOT objects from a specific layer, so we’ll use the UtilLevel field in the selection criteria.
                                             
From the screenshot you can see that all objects from the USR layer are selected, you can filter more by entrering the criteria you would like to do.

Friday, 27 December 2013

Error: Target date not found in work calendar error and solution

To resolve this error follow the following steps
Step-I: Go to Basic àCalendar
Do the setup for calendar
Map this Calendar in Workflow configurations as show in below figure
Project àSetup àWorkflow configurations

Note: With Step-I only I had done for my first workflow scenarios. I had done customization for SL1 layer related workflow, during this time customized the workflow and worked without any issues.
Actually defining the Calendar using this Step-I is enough, even though this setup exist also we will get the same error some times, as mentioned in the following case.


I had developed a new workflow for my client, and while working with that workflow again had faced the same Target date issue. [The Step-I setup already exist]

Then I had followed the Step-II
Step-II
Open the same Calendar form from the Basic module.

Now click on the Menu item Working times on the above form.
It will open the following form and on that from click on Menu item Compose working times.

It will open the dialog box, specify the date ranges and click on OK button of the dialog box

Observer the newly created work items, all are created with the Closed status as shown in below figure.

With this closed status also, we will get same Target date error.


So now we need to make change the status of these work items from Close to Open by using the following Job.
static void workCalendarUpdateJob(Args _args)
{
    WorkCalendarDate    WorkCalendarDate;
    ;
    ttsbegin;
    update_recordset WorkCalendarDate
        setting WorkTimeControl = WorkTimeControl::Open
        where WorkCalendarDate.CalendarId == "AdvaliTest";
    ttscommit;
}

I had completed the Workflow successfully, after this Step-II setup.


Start workflows manually without batch jobs configured in AX2012.


static void WorkflowManually(Args _args)
{
    SysWorkflowMessageQueueManager  queueManager;
    WorkflowWorkItemDueDateJob      workItemDueDateJob;
    ;
    queueManager = SysWorkflowMessageQueueManager::construct();
    queueManager.run();

    workItemDueDateJob = new WorkflowWorkItemDueDateJob();
    workItemDueDateJob.run();

}


Wednesday, 25 December 2013

AX2012 – Create a simple Production Order

Setting up Production in ax 2009

The production module is a subsidiary module of Inventory. It tracks the production process of manufactured items. The Inventory items and Bill of materials are set up in the Inventory module. Calendars, working time templates, work centers, and employees are set up in Basic module.

Pre-requisites:

·                     Administration module

·                     Basic module

·                     General ledger

·                     Inventory

·                     Vendors created in Account payable module if they are going to be used as Work centers (Subcontractors)

PRODUCTION TERMINOLOGY


BOM: A Bill of material is an item made up of other items. A BOM’s cost is derived from its components and the cost of producing the item. When production is complete, a BOM is a “finished good” that can be sold. The price of the BOM can be manually assigned or calculated by marking up the costs incurred in making it. Bill of materials can be simple and not require any operational costs or complex and require detailed production processes.

Simple BOM: Lamp – Assembly of a lamp & lamp shade

Complex BOM: Car – Made up of hundreds of components and BOM’s. It is possible to have BOM’s within a BOM. This is usually referred to as a sub-assembly or sub-BOM. When a Bill of material has several layers of BOM’s nested within it, it is referred to as having multiple layers. (Example of multi-layer BOM: Carburetor BOM within Engine BOM within car BOM.)

WIP: Work in Process. If costs are posted during the production cycle, they are posted to “Work in Process” accounts in the general ledger. When the production process is completed, the “finished good” inventory account is posted with the total cost of the production and the Work in process accounts are offset. If not using WIP, costs are not posted until the production is completed. This also means that the raw materials’ quantity-on-hand is not reduced until the production is complete.

Operation: A step in the production process. Examples: cutting, mixing, painting, assembly

Work center: The machine, persons, tools, or vendors used to perform the operation. Used for determining capacity when scheduling. Examples: Press machine, Assembly workers, Paint sprayer

Route: The sequence and length of time for operations that produce a Bill of material item. If each item is unique, there might be a route per inventory item; if not, several items can be attached to the same route.

Item consumption: Transferring the cost of the BOM components, also known as raw materials, to the production order and/or WIP accounts. The quantity-on-hand of the component items is reduced. Item consumption can be done automatically in Axapta or manually by entering a picking list journal. The item consumption can occur during the production process (WIP) or when the finished good is completed.

Route consumption: Calculating the cost of a production operation and transferring that cost to the production order and/or WIP Accounts. The cost of operation is made up of labor, tools, machine costs, vendor costs, and overhead. When an operation in the production process is performed, costs are generated. These costs are referred to as consumption. Consumption can be posted automatically in Axapta or manually by entering a route card or job card journal. Hours or quantity can be used to calculate the route consumption. See example of each below:

Example #1: Route consumption based on hourly cost.

Operation: Painting

Work center: Paint sprayer with 1 person running the sprayer.

Costs: $10/hr for 1person,

$0.32/hr for the cost of sprayer (Purchased for $2000 with an estimated life of 3 years. Usage of sprayer estimated to be 40hrs/week)

$0.80 overhead (Calculated based on utilities, rent, etc)

Est. Cost per hour =$11.12

Example #2: Route consumption based on quantity produced

Operation: Assembly

Work center: Assembly workers

Costs: $2 per item assembled per worker (Piecework)

Est. Cost per unit = $2

Production Overview


Steps for processing a Production Order:

1. Creation: An order can be created manually or generated automatically from a Sales order or Master planning schedule.

2. Estimation: Calculates material and (labor) route consumption. Creates inventory transactions (Issue transaction for raw materials with status on-order and Receipt transactions for the BOM being created with status ordered). Creates purchase orders and sub-productions if needed for the production order. Can reserve items (depends on parameter setting), and calculate the price of the finished good (depends on parameter setting).

3. Scheduling: There are two types of scheduling, Operations and Job scheduling.

· Operations scheduling assigns start and end dates to production orders, assigns cost center groups if attached to route operations, and provides a rough planning outline.

· Job scheduling provides a detailed planning outline. Each operation is broken down into jobs with specific dates, times, and work centers. If finite capacity is used, jobs are assigned based on availability. The schedule is outlined in a Gantt chart that can be manipulated.

4. Releasing to production: Production order documents such as the job card, route card, and route job can be printed. The status of the order changes to indicate that production can begin.

5. Starting: Once a production order is started, costs can be posted against the order. Estimated Material and route costs can automatically be allocated to the order when it is started. This is known as “pre-flushing” or “Auto-consumption”. Material can be manually allocated to the order by creating picking list journals. Labor and other route costs can be manually allocated to the order by creating a route card journal if using operations scheduling or by creating a job card journal if using job scheduling.

6. Reporting-as-finished: When a production order is reported-as-finished, the quantity of the finished good completed is updated in the inventory module. If using “Work in Process” accounting, a ledger journal is made to reduce the “WIP” accounts and increase the inventory of the finished good. Standard cost from the item form is used. When a production order is cost calculated, the actual cost of the production is posted and the posting that occurs during reporting-as-finished is reversed. If the material and labor costs associated with the production are not already allocated through a journal or pre-flushing, they can be automatically allocated by “back flushing”. If the production order is complete, it can be marked “End job” to change the remaining status to “Costing”; otherwise it is left open to report additional quantities produced.

7. Cost calculating: The final actual costs of a production run are calculated on the quantity that was produced. All of the previously posted estimated costs for material, labor, and the overhead are reversed and replaced with the actual costs of production. If costing is marked as “End job” the production order is changed to a status of “Ended” and no further costs can be posted against the order. An order can be “reported-as-finished” when costing, if that step is not already completed.

8. Ending: If a production order has a status of “Ended” no costs can be posted to it. The status can be changed by checking the End job box when cost calculating the production order. This status prevents any additional costs from being inadvertently posted to a completed production order.

Setup Check List

This section provides an overview, in the form of a checklist, of all the setup for the Production module. The subsequent sections of this manual provide the details of each of these setup options. The required setup is for basic production capabilities.

REQUIRED SETUP –  Required to operate Dynamics AX in a typical U.S. installation

OPTIONAL SETUP – Not required by Dynamics AX; but may be needed to perform desired business functions

Required setup

·                     Working time templates Define the time available daily for production scheduling. (Basic module)

·                     Calendar Define the days of the year available for production scheduling. (Basic module)

·                     Work center groups Define the apparatus used for capacity planning in the production process. (Basic module) If general ledger postings are based on the work center, then ledger accounts must be specified.

·                     Journal names Identify the transaction journals to be used in the production module

·                     Cost categories Define the labor and overhead cost per hour or per unit associated with production

·                     Routing groups Used to determine default settings for costing and pricing route operations

·                     Operations Define each step in the production process

·                     Parameters Define default data and basic settings for the production module

OPTIONAL setup

·                     Production groups Used to determine ledger accounts for posting or to group orders for reporting

·                     Production pools Group production orders for processing, deleting, or reporting

·                     Properties Define characteristics of items that suggest they be produced together to reduce setup time

·                     Task groups Define alternate work centers used if the suggested work center is at full capacity

We have a very detailed document to guide our customer how to set up the production module as well as the required set up in other modules. Please feel free to send us an email to request it.


Tuesday, 24 December 2013

Complex Dynamic Query with text file in ax 2012 through X++

private void createQuery()
{
    Query                       query = new Query();
    QueryBuildDataSource        qbdsCUstTable;
    QueryBuildDataSource        qbdsAccType;
    QueryBuildDataSource        qbdsConRes;
    QueryBuildDataSource        qbdsConnection;
    QueryBuildDataSource        qbdsConStatus;
    QueryBuildDataSource        qbdsDevice;
    QueryBuildDataSource        qbdsConfigHist;
    QueryBuildDataSource        qbdsDeviceStatus;
    QueryBuildDataSource        qbdsFreqHist;
    QueryRun                    queryRn;
    Name                        tmpName;
    FcsDateTime                 tmpDateTime = FcsDateTimeAPI::dateNow();
    McsConfigurationHistory     configHistLocal;
    FcsDateTime                 startDateLocal,endDateLocal;
    str                         seprator = McsParameters::find().FedSBMDownloadSeperator;
    McsFedOMDivision            division;
    McsFedOMSubDivision         subDivision;
    McsFedOMSection             section;
    McsEmCalcCalculatedConsumption  calCOnsumption;
    McsConnectionMember         conMember;

    ;

    qbdsCUstTable = query.addDataSource(tableNum(CustTable));
    //.............added by aslam
    if(DivisionId)
    {
          qbdsCUstTable.addRange(fieldNum(CustTable,FedDivisionId)).value(DivisionId);
    }
    if(SubDivId)
    {
          qbdsCUstTable.addRange(fieldNum(CustTable,FedSubDivId)).value(SubDivId);
    }
    if(SectionId)
    {
          qbdsCUstTable.addRange(fieldNum(CustTable,FedSectionId)).value(SectionId);
    }
    if(cycleCode)
    {
          qbdsCUstTable.addRange(fieldNum(CustTable,FedCycleCode)).value(cycleCode);
    }
    //...............end by aslam
    qbdsAccType = qbdsCUstTable.addDataSource(tableNum(McsAccountTypeHistory));
    qbdsAccType.addLink(fieldNum(custTable,AccountNum),fieldNum(McsAccountTypeHistory,CustomerId));
   // qbdsAccType.joinMode(JoinMode::InnerJoin);
    qbdsAccType.addRange(fieldNum(McsAccountTypeHistory,AccountType)).value(queryValue(McsGlobal::getDefaultAccountTypeMainRelation()));
    qbdsAccType.addRange(fieldNum(McsAccountTypeHistory,ValidUntilDate)).value(queryValue(FcsDateTimeAPI::DateNull()));

    qbdsConRes = qbdsAccType.addDataSource(tableNum(McsConnectionResponsible));
    qbdsConRes.addLink(fieldNum(McsAccountTypeHistory,Id),fieldNum(McsConnectionResponsible,AccountTypeHistoryId));
    qbdsConRes.addRange(fieldNum(McsConnectionResponsible,ValidUntilDate)).value(queryValue(FcsDateTimeAPI::DateNull()));
    //qbdsConRes.joinMode(JoinMode::InnerJoin);

    qbdsConnection = qbdsConRes.addDataSource(tableNum(McsConnection));
    qbdsConnection.addLink(fieldNum(McsConnectionResponsible,ConnectionId),fieldNum(McsConnection,Id));
    //qbdsConnection.addOrderByField(fieldNum(McsConnection,Id),SortOrder::Ascending);
    //qbdsConnection.joinMode(JoinMode::InnerJoin);

    qbdsConStatus = qbdsConnection.addDataSource(tableNum(McsConnectionStatusHistory));
    qbdsConStatus.addLink(fieldNum(McsConnection,Id),fieldNum(McsConnectionStatusHistory,ConnectionId));
    qbdsConStatus.addRange(fieldNum(McsConnectionStatusHistory,ConnectionStatus)).value(queryValue(McsStatuses::Active));
    qbdsConStatus.addRange(fieldNum(McsConnectionStatusHistory,ValidUntilDate)).value(queryValue(FcsDateTimeAPI::DateNull()));
    //qbdsConStatus.joinMode(JoinMode::InnerJoin);

    /*qbdsFreqHist = qbdsConnection.addDataSource(tableNum(McsCmBilBilFrequencyHistory));
    qbdsFreqHist.addLink(fieldNum(McsConnection,Id),fieldNum(McsCmBilBilFrequencyHistory,Connectionid));
    qbdsFreqHist.addRange(fieldNum(McsCmBilBilFrequencyHistory,ValidUntilDate)).value(queryValue(FcsDateTimeAPI::DateNull()));
    qbdsFreqHist.addRange(fieldNum(McsCmBilBilFrequencyHistory,DataAreaId)).value(queryValue('((LastBillingDate < EndDate) || (EndDate == 0))'));
    //qbdsFreqHist.addRange(fieldNum(McsCmBilBilFrequencyHistory,NextBillingDate)).value(queryValue(FcsDateTimeAPI::addDayLocal(this.parmEndDate(),1)));
    qbdsFreqHist.addSortField(fieldNum(McsCmBilBilFrequencyHistory,StartDate),SortOrder::Ascending);
    qbdsFreqHist.joinMode(JoinMode::InnerJoin);*/

    qbdsConfigHist = qbdsConStatus.addDataSource(tableNum(McsConfigurationHistory));
    qbdsConfigHist.addLink(fieldNum(McsConnectionStatusHistory,ConnectionId),fieldNum(McsConfigurationHistory,ConnectionId));
    qbdsConfigHist.addRange(fieldNum(McsConfigurationHistory,ValidUntilDate)).value(queryValue(FcsDateTimeAPI::DateNull()));
    //qbdsConfigHist.joinMode(JoinMode::InnerJoin);

 qbdsDevice = qbdsConfigHist.addDataSource(tableNum(McsMeterDevice));
    qbdsDevice.addLink(fieldNum(McsConfigurationHistory,MeterDeviceId),fieldNum(McsMeterDevice,Id));
    qbdsDevice.addRange(fieldNum(McsMeterDevice,FedPhase)).value(queryValue(McsFedPhases::ThreePhase));

    //qbdsDevice.joinMode(JoinMode::InnerJoin);

    qbdsDeviceStatus = qbdsDevice.addDataSource(tableNum(McsMeterDeviceStatusHistory));
    qbdsDeviceStatus.addLink(fieldNum(McsMeterDevice,Id),fieldNum(McsMeterDeviceStatusHistory,   MeterDeviceId));
    qbdsDeviceStatus.addRange(fieldNum(McsMeterDeviceStatusHistory,MeterDeviceStatus)).value(queryValue(McsStatuses::Active));
    qbdsDeviceStatus.addRange(fieldNum(McsMeterDeviceStatusHistory,ValidUntilDate)).value(queryValue(FcsDateTimeAPI::DateNull()));

    //qbdsDeviceStatus.joinMode(JoinMode::InnerJoin);


    queryRn = new QueryRun(query);

    totalRecords = SysQuery::countLoops(queryRn);
    progress.setCaption("Downlaod Customer");

    progress.setAnimation(#aviUpdate);

    progress.setTotal(totalRecords);


    progress.update(true);
    totalRecords = 0;
    while (queryRn.next())
    {
        //custTable.clear();
        //meterDevice.clear();
        //Connection.clear();
        //configHistLocal.clear();

        custTable = queryRn.get(tableNum(CustTable));
        meterDevice = queryRn.get(tableNum(McsMeterDevice));
        Connection  = queryRn.get(tableNum(McsConnection));
        configHistLocal = queryRn.get(tableNum(McsConfigurationHistory));
        progress.setText("Exporting Customer " + custTable.name());
        progress.update(true);
        //Consumer No. ---1
        tb.setText(tb.getText() + strFmt("%1%2",custTable.McsExternalID1,seprator));
        //Old K Number----2
        tb.setText(tb.getText() + strfmt("%1%2",custTable.McsExternalId3,seprator));
        //Tariff Code ----3
        tb.setText(tb.getText() + strfmt("%1%2",custTable.CustGroup,seprator));
        //Meter Serial Number---4
        tb.setText(tb.getText() + strfmt("%1%2",meterDevice.MeterDeviceSerialNumber,seprator));
        //Consumer Name---5
        tb.setText(tb.getText() + strfmt("%1%2",subStr(custTable.name(),1,20),seprator));
        //Address---6
        tb.setText(tb.getText() + strfmt("%1%2",subStr(custTable.address(),1,20),seprator));
        //Cycle Display Code----7
        tb.setText(tb.getText() + strfmt("%1%2",custTable.FedCycleCode,seprator));
        //Route Nbr---8
        tb.setText(tb.getText() + strfmt("%1%2",custTable.FedRouteNbr,seprator));

        //Division---9
        division.clear();
        select DisplayCode from division
            where division.DivisionId == custTable.FedDivisionId;

        tb.setText(tb.getText() + strfmt("%1%2",division.DisplayCode,seprator));

        //SubDivision---10
        subDivision.clear();
        select DisplayCode from subDivision
            where subDivision.SubDivId == custTable.FedSubDivId;
        tb.setText(tb.getText() + strfmt("%1%2",subDivision.DisplayCode,seprator));

        //section---11
        section.clear();
        select DisplayCode from section
            where section.SectionId == custTable.FedSectionId;
        tb.setText(tb.getText() + strfmt("%1%2",section.DisplayCode,seprator));

        //BillMonth---12
        select EndDate from calCOnsumption
        order by EndDate desc
        exists join conMember
            where conMember.Id == calCOnsumption.ConnectionMemberId
            && calCOnsumption.ValidUntilDate == 0
            && conMember.ValidUntilDate == 0
            && conMember.ConnectionId == Connection.Id
            && conMember.ConnectionMemberType == McsConnectionMemberTypes::mmrcons;

        tb.setText(tb.getText() + strfmt("%1",date2str(FcsDateTimeAPI::convertToDateLocal(    calCOnsumption.EndDate),123,0,0,3,3,2)));
       tb.setText(tb.getText() + strfmt("\n"));
        progress.incCount();
        progress.update(true);
    }

}